
How to Make Worm Tea? [Simple Steps]
Worm tea, derived from the magic of earthworms and the alchemy of composting, is more than just a gardener’s delight; it’s a powerful elixir teeming with nutrients and beneficial microorganisms that can help to grow your plants fast. Whether you’re nurturing a thriving vegetable garden, tending to fruit trees, or cultivating a bed of vibrant flowers, worm tea is your key to unlocking a world of horticultural success.
In this guide, we’re going to dive deep into the world of worm tea, exploring its benefits, applications, and the essential know-how for making your very own worm casting tee.
What Is Worm Tea?
Worm tea, also known as worm casting tea or vermicompost tea, is a nutrient-rich liquid fertilizer that gardeners and plant enthusiasts swear by for its incredible benefits. It’s produced through a simple process involving the extraction of valuable nutrients and beneficial microorganisms from worm castings or vermicompost. In this comprehensive guide, we’ll delve deep into the world of worm tea, exploring its benefits, applications, and how to make this liquid gold for your garden.
Benefits of Worm Casting Tea
Worm casting tea is a powerhouse of nutrients and beneficial microorganisms that can significantly boost the health and vitality of your plants. Here are some key benefits:
- Nutrient-Rich Elixir
Worm tea is loaded with essential nutrients such as nitrogen, phosphorus, potassium, and micronutrients like calcium, magnesium, and iron. These nutrients are readily available to your plants, promoting robust growth and increased yields.
- Enhanced Soil Health
The beneficial microorganisms present in worm tea help improve soil structure and enhance its ability to retain moisture and nutrients. This, in turn, reduces soil erosion and helps your plants access essential elements more efficiently.
- Pest and Disease Resistance
The microbial diversity in worm casting tea creates an environment that suppresses harmful pathogens and pests, reducing the need for chemical pesticides.
- Environmentally Friendly
Worm tea is an eco-friendly alternative to synthetic fertilizers, minimizing environmental pollution and harm to beneficial insects.
Which Plants Benefit from Worm Casting Tea?
While almost all plants can benefit from worm casting tea, certain types particularly thrive with its application. These include:
- Vegetables: Tomatoes, peppers, cucumbers, and leafy greens like lettuce and spinach.
- Fruit Trees: Apple, pear, citrus, and stone fruit trees.
- Herbs: Basil, mint, rosemary, and parsley.
- Flowering Plants: Roses, marigolds, and dahlias.
- Garden Shrubs: Azaleas, rhododendrons, and camellias.
How Often Should You Use Worm Tea?
The frequency of worm tea application depends on several factors, including plant type, soil condition, and weather. As a general guideline:
- Young Seedlings: Apply worm tea every 2-4 weeks.
- Established Plants: Use worm tea monthly during the growing season.
- Potted Plants: Apply worm tea every 2-4 weeks to maintain soil health.
- Fruit Trees: Apply during the dormant season and monthly during the growing season.
How to Apply Worm Tea for Plants?
Proper application is key to reaping the benefits of worm casting tea effectively. Here’s how to do it:
- Dilution: Always dilute worm tea with water at a 1:10 ratio (1 part tea to 10 parts water) to avoid over-fertilization.
- Foliar Spray: Spray the diluted worm tea directly onto the leaves and stems of your plants. This method provides a quick nutrient boost and enhances disease resistance.
- Soil Drench: Pour the diluted tea around the base of your plants, allowing it to soak into the root zone. This method provides nutrients directly to the roots.
- Compost Tea Bag: Use a compost tea bag or old pantyhose to contain the worm tea solids while applying it to prevent clogs in your spray equipment.
- Early Morning or Late Evening: Apply worm tea in the early morning or late evening to minimize stress on plants due to heat.
How Long Does Worm Tea Last?
Worm tea should be used promptly for the best results. It’s most effective when used within 24-48 hours of brewing. After this period, the beneficial microorganisms may start to decline in number.
How to Make Worm Casting Tea?
Now, let’s dive into the exciting process of making worm casting tea. Here’s what you’ll need:
Ingredients:
- Worm castings or vermicompost
- Water
- Unsulfured molasses (optional)
- Aeration equipment (air pump and air stone)
- Large container (5-gallon bucket or similar)
- Cheesecloth or fine mesh bag
- Stirring stick
Steps:
Here are the simple steps to make worm tea.
- Gather Worm Castings: Collect high-quality worm castings or vermicompost. Ensure they are free from contaminants and debris.
- Prepare the Container: Fill the large container with water, leaving a few inches of space at the top.
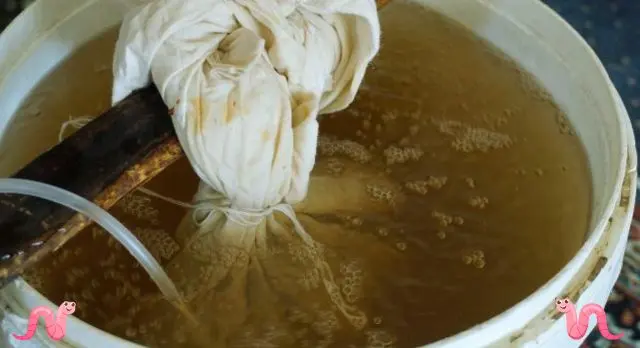
- Add Worm Castings: Place a generous amount of worm castings into a cheesecloth or fine mesh bag and tie it securely.
- Submerge the Bag: Submerge the bag of worm castings in the water-filled container. If desired, add a small amount of unsulfured molasses to feed the beneficial microorganisms.
- Aerate the Mixture: Attach the air stone to the air pump and place it at the bottom of the container. Turn on the pump to provide continuous aeration. Aeration ensures that beneficial microorganisms thrive during the brewing process.
- Brewing Time: Allow the mixture to brew for 24-48 hours. During this time, the beneficial microorganisms will multiply, creating a potent tea.
- Strain and Apply: After brewing, remove the bag of worm castings, and strain the liquid through a fine mesh to remove any remaining solids. Your worm casting tea is now ready to use.
How to Make Worm Casting Tea for Plants?
Making worm casting tea for your plants is easy! Here’s a simple way to do it:
- Get some worm castings or vermicompost – it’s like magic soil made by worms.
- Fill a big bucket with water, leaving some space at the top.
- Put the worm castings in a bag, like an old sock or pantyhose, and tie it up tight.
- Put the bag of worm castings into the water in the bucket.
- If you want to give the tea a little extra boost, you can add a tiny bit of molasses (a type of sweet syrup) to the water. This helps the good stuff in the worm castings grow even more.
- You’ll need some air bubbles to make the tea, so get an air pump and a little stone that makes bubbles. Put them in the bucket too.
- Let everything sit for about 24-48 hours. This is like making tea, but for your plants!
- After waiting, take out the bag of worm castings and strain the liquid through a fine mesh to get rid of any bits.
- Now you have worm casting tea! You can use it to water your plants, and they’ll be super happy because it’s packed with good stuff.
How to Make Worm Casting Tea for Hydroponics?
Making worm casting tea for hydroponics is similar to making it for regular plants, but you’ll use it in a different way. Here’s what to do:
- Follow steps 1 to 4 from the previous answer to get your worm castings in a bag and into a bucket of water.
- You can add a tiny bit of molasses if you like.
- Use an air pump and stone to make bubbles in the water, just like before.
- Let it sit for 24-48 hours, like making tea.
- After that, remove the bag of worm castings and strain the liquid.
- Now, instead of watering soil, you’ll use this tea in your hydroponic system to feed your plants. It’s like a special drink for them!
How to Make Worm Tea for Growing Lettuce?
Growing lettuce with worm tea is a great idea! Here’s how to do it:
- Start with worm castings or vermicompost – your lettuce will love it.
- Fill a big bucket with water, leaving some space at the top.
- Put the worm castings in a bag, like an old sock or pantyhose, and tie it up tight.
- Place the bag of worm castings into the water in the bucket.
- If you want to give your lettuce a little extra treat, you can add a tiny bit of molasses to the water. It’s like adding sugar for flavor!
- You’ll need some air bubbles to make the tea, so get an air pump and a little stone that makes bubbles. Put them in the bucket too.
- Let everything sit for about 24-48 hours. It’s like steeping tea, but for your lettuce!
- After waiting, remove the bag of worm castings and strain the liquid through a fine mesh to get rid of any bits.
- Now you have worm tea for your lettuce! Use it to water your lettuce plants, and they’ll grow big and tasty.
Do You Need to Aerate Worm Tea?
Aeration is a critical step in the worm tea-making process. It ensures the growth and multiplication of beneficial microorganisms, making the tea more potent and effective. Without aeration, the tea may not reach its full potential.
In summary, worm casting tea is a natural and sustainable way to provide your plants with essential nutrients and enhance soil health. By following the guidelines for its application and making your own tea at home, you can enjoy the benefits of healthier, more vibrant plants while contributing to a more eco-friendly garden ecosystem.
Related guide – How to Use Earthworm Castings?
Key Takeaways
- Worm casting tea is a nutrient-rich elixir that promotes plant growth, enhances soil health, and boosts pest resistance.
- Various plants, including vegetables, fruit trees, herbs, and flowering plants, benefit from worm tea application.
- The frequency of worm tea use depends on plant type, soil condition, and season.
- Proper application methods include foliar spray and soil drench, with a recommended dilution ratio of 1:10.
- Use worm tea within 24-48 hours of brewing for maximum effectiveness.
- To make worm casting tea, gather worm castings, water, and optional molasses. Aerate the mixture for 24-48 hours, then strain and apply.
- Aeration is crucial during the tea-making process to encourage beneficial microorganism growth and enhance the tea’s potency.